Crow pose yoga can look like it requires extraordinary flexibility or powerful arms. In reality, Bakasana depends just as much on thoughtful hand placement, balanced weight distribution, core engagement, and consistent practice. With the right preparation, this arm balance becomes an approachable way to build strength and body awareness.
You may wobble, step down, or feel uncertain at first. That is a natural part of learning. Crow Pose invites you to breathe steadily, focus your attention, and respond calmly as your balance shifts. Over time, this patient practice can nurture confidence both on the mat and beyond it.
This guide will help you progress with care. We’ll begin with preparation and simple equipment, then explore hand placement, weight shifting, and core engagement step by step. You’ll also find drills, modifications, safety guidance, and troubleshooting tips for common challenges.
Most importantly, there is no need to force the pose or measure your progress against anyone else’s. Approach each attempt as a conversation with your body, noticing what feels stable and what needs more time. With encouragement from Joyous Yoga, you can develop a practice rooted in mindfulness, balance, and self-trust.
What Crow Pose Builds—and What You Need Before You Begin
Crow Pose asks your whole body to work together. Your hands and wrists support your weight, while your shoulders, arms, chest, and core create a steady foundation. In crow pose yoga, progress comes from coordination and awareness, not from proving how advanced you are.
Your wrists gradually develop resilience as you press through your palms and spread your fingers. Your shoulders learn to stabilize, while your triceps and chest help bend and support the arms. Meanwhile, abdominal control keeps your hips lifted and helps prevent your legs from feeling heavy.
Crow Pose also involves your hips and gaze. A comfortable deep squat requires enough hip mobility to bring your knees toward your upper arms. Your gaze then guides your balance; looking slightly forward, rather than straight down, can help your body organize and lift.
It is helpful to separate strength from mobility and coordination. You may have strong arms but need more hip mobility. Or you may be flexible enough to squat deeply but still be learning how to shift your weight safely. Crow Pose develops proprioception, or your body’s sense of position, as you notice subtle changes in pressure, balance, and alignment.
Crow generally uses bent elbows, with the knees resting near the upper arms. Crane Pose is a related variation that uses straighter arms and demands more strength and control. Think of Crane as a possible later progression, not a requirement for practicing Crow.
Before you begin, consider these readiness markers:
- You can hold Tabletop and Plank with control and steady breathing.
- You can bear weight through your hands without discomfort.
- You can move into a deep squat without sharp pain.
- You can shift your weight forward while keeping your shoulders engaged.
These markers do not need to feel perfect. They simply suggest that your body has a useful foundation for exploring the pose gradually. You can also practice wrist preparation, core work, and supported squats before attempting a full lift.
Pain is different from effort. If you experience wrist or shoulder pain, have a recent injury, uncontrolled blood pressure, or another medical concern, seek guidance from a qualified healthcare or yoga professional first. A teacher can offer modifications that respect your body and support a mindful, confident beginning.
Set Up Your Practice: Warm-Up, Props, and a Safe Environment
A thoughtful setup helps you explore crow pose yoga with greater awareness. Preparation should make the pose safer and more informative, not remove every challenge. Choose a quiet space where you can focus on your breath, balance, and the signals from your body.
Begin with 10 to 15 minutes of progressive movement. Start gently, then build heat before asking your wrists, shoulders, hips, and core to support your weight.
- Circle your wrists in both directions, then move through gentle wrist flexion. Place your palms down and slowly shift your weight forward and back.
- Move through several rounds of Cat-Cow. Let your spine warm gradually while coordinating each movement with your breath.
- Press back into Downward-Facing Dog. Pedal your feet and keep your shoulders active without forcing your heels toward the floor.
- Practice a few plank variations, such as high plank and knee-supported plank. Hold each for several breaths, maintaining steady shoulder engagement.
- Lower into a comfortable squat. Lift your chest, soften your jaw, and explore how your hips and ankles move.
- Finish with gentle core activation. From your back, try slow dead-bug movements, or hold tabletop while drawing your lower ribs inward.
Give your wrists special attention. Spread your fingers widely, press through the knuckles and fingertips, and keep the center of each palm light. Gradually increase the load through your hands during warm-up rather than placing your full body weight on cold wrists immediately.
Your mat matters, too. Choose a stable surface with enough grip to prevent your hands and feet from sliding. Wear comfortable yoga apparel that allows your hips to move freely. Fitted clothing is often helpful, since loose fabric can slip over your face or obstruct your vision as you lean forward.
Clear the practice area before you begin. Move away from walls, furniture, sharp corners, and other hard obstacles. A folded blanket placed in front of your head can offer reassurance while you practice shifting forward, but it is only a confidence aid. It cannot replace careful technique, active hands, or controlled movement.
If your wrists feel strained during the warm-up, pause and adjust. Try placing less weight through your hands, returning to a supported squat, or practicing another strengthening movement. A focused practice begins with listening closely, so every preparation choice supports steadiness and self-trust.
Crow Pose Step by Step: From Squat to Balanced Armstand
Now that your wrists, shoulders, and core feel prepared, come to the front of a grippy yoga mat. For help choosing the right surface, explore a grippy yoga mat. Begin in a low squat with your feet close together, or separate them slightly for comfort. Keep your heels lifted or supported, and let your spine lengthen as you settle into the shape.
-
Set up your hands. Place your palms shoulder-width apart, with your fingers spread wide. Press through the base of each finger and your fingertips, creating an active connection with the floor. Your hands should feel steady and spacious rather than collapsed.
-
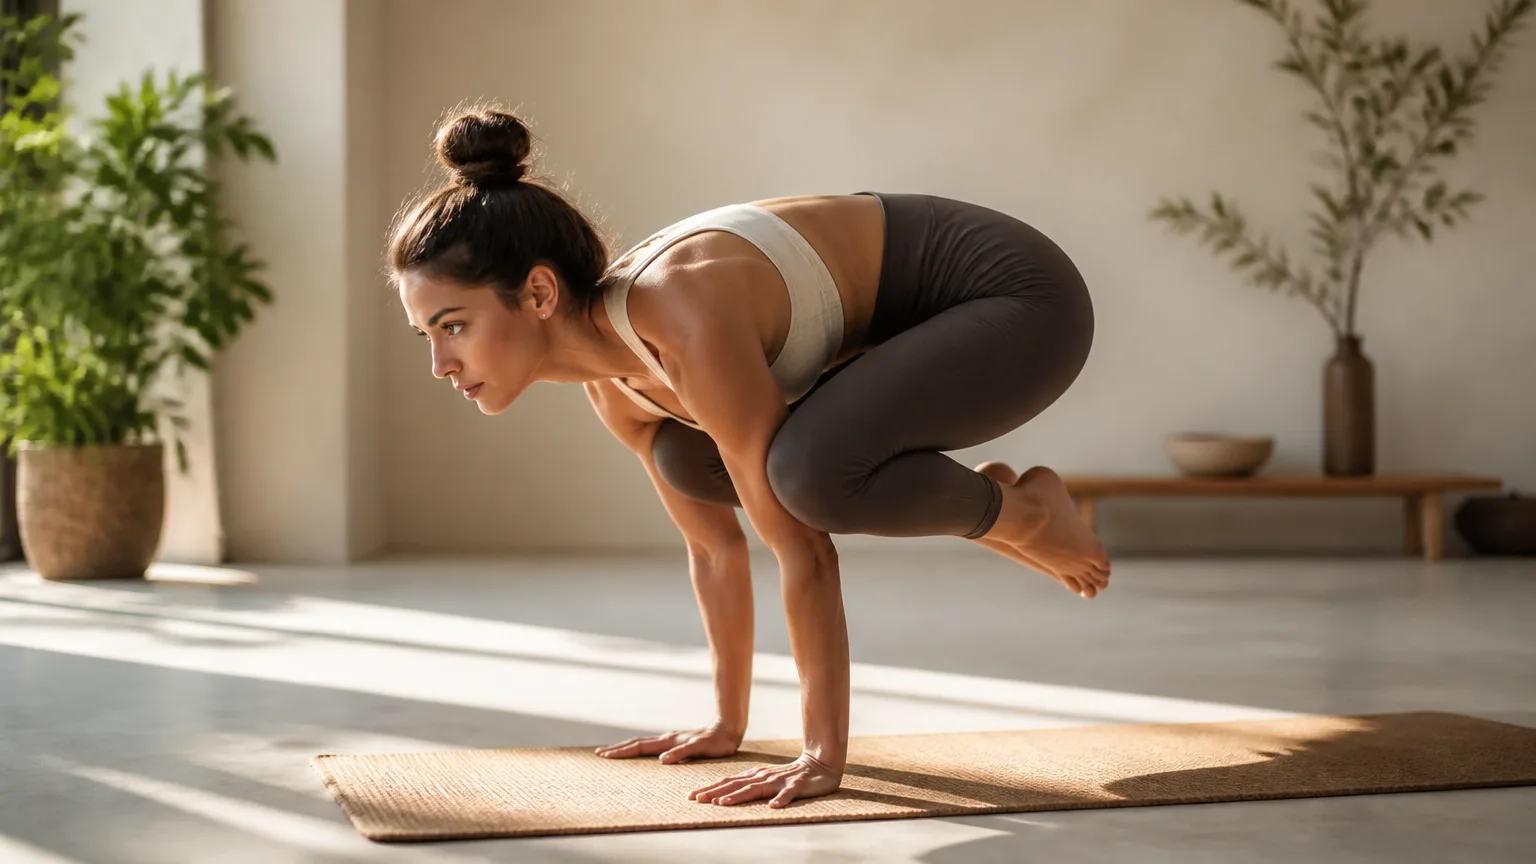
Build your support structure. Lean forward slightly and press the floor away from you. Rotate your upper arms gently outward while bending your elbows toward a right angle. Keep your elbows tracking back rather than splaying out to the sides, which helps protect your shoulders and creates a stronger base.
-
Place your knees. Lift your hips higher than your shoulders and bring your knees onto your upper arms. Depending on your proportions, they may rest high near your armpits or lower along the backs of your upper arms. Aim for a secure contact that feels firm, not painful or compressed.
-
Shift your weight gradually. Move your shoulders forward beyond your wrists while keeping your fingertips active. This forward shift may feel surprising, but it allows your center of mass to travel over your hands. Keep your gaze slightly forward on the floor, rather than looking directly down between your palms.
-
Explore lift-off. Begin by lightening one foot, then the other. You might lift a single toe while the opposite foot remains grounded. This is meaningful progress in crow pose yoga because you are learning the balance point without forcing a full armstand.
As your weight moves into your hands, draw your heels toward your sitting bones. Pull your navel inward and round gently through your upper back, as though you are widening the space between your shoulder blades. This compact shape keeps your center of mass over your hands and helps your legs feel lighter.
Keep your elbows bent and your shoulders lifted away from your ears. Avoid sinking into the joints or kicking your feet upward. Instead, imagine you are pressing the floor away while floating from the center of your body.
Breathe calmly throughout the transition. Take a steady inhale as you prepare, then exhale slowly as you shift forward and lift. Do not hold your breath during lift-off; relaxed breathing helps your nervous system stay present and supports steadier balance.
Once both feet rise, remain for one to three controlled breaths. Keep your gaze steady and your core gently engaged. To exit, slowly lower one foot and then the other into your squat, resisting the urge to drop suddenly.
You can also lower your knees and settle into Child’s Pose for a restful release. If your balance changes unexpectedly, return to the squat and reset. Every careful attempt, including one with only a single toe lifted, builds strength, awareness, and trust.
Build the Skills with Progressive Crow Pose Drills
If both feet still feel far from the floor, build the pose in smaller stages. Crow pose yoga requires wrist strength, shoulder stability, and steady core control. Short, mindful drills help you develop these skills without rushing your body.
Begin with wrist and shoulder conditioning. Circle your wrists, spread your fingers, and practice shifting gently forward and back over your hands. Move through plank-to-knee exercises, drawing one knee toward the same-side arm, then switch sides. Slow mountain climbers can add control, especially when you keep your shoulders above your wrists and your breath smooth.
Practice three to five rounds of these movements. Rest between rounds, and stop before your wrists or shoulders become fatigued. Quality effort creates more useful strength than practicing until your alignment collapses.
Next, explore the shape in Malasana, or yogi squat. Keep your feet active by pressing through the toes and outer edges of your feet. Place your knees onto your upper arms while keeping your toes grounded, then lean forward slightly and return to the squat. This teaches your body the position without the pressure of a full lift-off.
When that feels familiar, try lifting one foot at a time. From the supported Crow shape, shift forward until one foot becomes light, then lift it briefly. Set it down with control and change sides. You can also practice gentle toe taps, lifting both heels for a moment before lowering them again.
An elevated variation can make the forward shift easier to understand. Place your feet on a sturdy block behind you, then bring your knees toward your arms and lean forward. Because your feet begin higher, you may find more space to explore balance. A yoga ball for stability work can also support broader strength and body awareness, but use it only with enough room and control.
A wall or trusted spotter can provide reassurance during repeated attempts. Let the wall catch your feet or ask your spotter to offer light support, rather than lifting you into the pose. You still create balance through firm hand pressure, active fingertips, and engaged abdominal muscles.
Try three to five quality attempts, resting for several breaths between them. If your wrists or shoulders feel tired, return to Malasana, Child’s Pose, or another gentle reset. Each controlled toe tap and partial lift strengthens your awareness, preparing you for a steadier Crow Pose over time.
Fix Common Crow Pose Mistakes and Balance Problems
If your Crow Pose feels unstable, pause and notice where the challenge begins. Small changes to your gaze, hand pressure, and weight shift can make crow pose yoga feel more supported and approachable.
Looking straight down: Your gaze can influence your balance more than you expect. Looking directly between your hands often sends your weight backward, making it harder to lift your feet. Instead, look a few inches ahead of your hands while keeping your neck relaxed. Your head should stay in line with your spine, without straining or lifting your chin.
Elbows winging outward: When your elbows move wide, your arms lose a strong base of support. Keep them tracking back, as though you are lowering into a narrow Chaturanga shape. Press firmly through all four corners of your hands, especially the fingertips, to steady your weight and protect your wrists.
Jumping into the pose: A sudden jump can pull your shoulders behind your wrists and make balance unpredictable. Begin with your toes on the floor, then slowly lean forward until your shoulders move beyond your wrists. Keep the transfer quiet and controlled. Lift one foot, then the other, only when your hands and shoulders feel ready to support you.
Sagging shoulders or an arched lower back: Letting the chest collapse makes the pose heavier. Arching the lower back can also reduce control. Press the floor away, spread your shoulder blades actively, and create a gentle rounding through your upper back. Draw your abdominal muscles inward as you lift, keeping your ribs from spilling forward.
If your feet come down, treat it as information rather than failure. Falling out is a normal part of learning balance, especially while your body develops strength and coordination. Return to your squat, breathe, and try again with one small adjustment.
Ordinary wobbling or stepping down is different from pain. Stop if you feel sharp or persistent discomfort in your wrists, shoulders, neck, or knees. Rest, modify, and seek guidance from a qualified professional when needed.
Modify Crow Pose for Different Bodies and Practice Levels
Crow Pose can meet you at many starting points. The most supportive version is the one that lets you breathe, stay attentive, and learn without pain.
If you are new to crow pose yoga, keep your toes on the floor as you explore the knee-to-arm connection. You might lift one foot at a time, place a block beneath your feet, or practice from a supported squat. These options build confidence without requiring a full lift.
For sensitive wrists, try making gentle fists or using parallettes if they preserve stable alignment. Elevating your hands on sturdy blocks can also reduce the angle at your wrists. Stop if symptoms worsen, and seek professional assessment for pain that persists.
Limited hip mobility may make the deep squat feel challenging. Widen your stance and place a folded blanket beneath your heels for support. Spend extra time in squat preparation instead of forcing your knees onto your arms.
You can practice shifting forward, engaging your core, and returning to the squat with control. This approach develops the same mindful coordination while giving your hips time to adapt.
Experienced practitioners may gradually increase their hold time or explore smoother entries. Once the basic shape feels stable and pain-free, you might investigate Crane Pose, side variations, or transitions to and from other postures.
Progress does not mean choosing the most demanding option. A modification succeeds when it supports steady breathing, controlled movement, and meaningful learning. Let your body guide the practice, and allow each variation to become part of your unique path.
Make Crow Pose Part of a Balanced Yoga Practice
Crow Pose becomes more sustainable when it supports your whole practice, rather than becoming its only goal. Place it after a warm-up and before deep fatigue, when your body feels prepared and your attention remains clear.
Try beginning with Sun Salutations, plank variations, and a few squats. Add hip openers, such as Low Lunge or Pigeon Pose, before practicing two or three focused Crow Pose attempts. Finish with Child’s Pose, a gentle seated forward fold, or another restorative counterpose.
Balance arm-balance work with care for your wrists. After each round, release your hands, gently stretch your forearms, or circle your wrists slowly. Seated breathing can also help your nervous system settle. On days when your wrists or shoulders feel tired, choose recovery movements or take a rest day.
Track process-based progress instead of focusing only on holding Crow Pose longer. Notice quieter landings, steadier breathing, smoother weight shifts, and a greater willingness to try. These changes show growing balance and strength, even when both feet remain close to the ground.
Mindful attention can turn every attempt into concentration practice. Notice fear, gripping, or changes in your breath without judging them. Then choose one technical adjustment, such as shifting forward more gradually, and observe what changes.
Community can make learning feel encouraging and connected. With consent and appropriate supervision, practicing beginner-friendly partner yoga poses can build trust and shared balance. Partners should support awareness, not pressure anyone into a pose.
Let Crow Pose yoga remain an invitation to listen, explore, and grow. A balanced practice honors effort, recovery, and the many meaningful ways progress can unfold.
Frequently Asked Questions About Crow Pose Yoga
How long does it take to learn Crow Pose?
Every body and practice history is different. Some people lift their feet quickly, while others need weeks or months of preparation. Consistent, short practices, foundational strength, and improved technique matter more than meeting a fixed deadline.
Why can’t I lift both feet?
You may not be shifting enough weight forward, or your gaze may be too far back. Knee placement, firm hand pressure, and fear of tipping can also affect your lift. Practice partial lifts by raising one foot at a time, tapping your toes down, or using a cushion beneath you.
Should Crow Pose hurt my wrists?
Mild pressure or unfamiliar effort can be normal as your wrists adapt. Sharp, persistent, or worsening pain is not. Stop when pain appears, return to a supported squat, and ask a qualified professional about modifications if discomfort continues.
Is Crow Pose safe for beginners?
Crow Pose yoga can be beginner-friendly when approached gradually. Warm up your wrists, shoulders, and hips, practice on a clear floor, and use partial-lift variations. Avoid practicing through a recent injury, uncontrolled blood pressure, or another health concern without professional guidance.
What if I fall forward?
Falling or stepping down is part of learning balance. Practice near a soft surface, keep your gaze slightly forward, and bend your elbows gently rather than collapsing. A teacher can help you build confidence and refine your setup.
How often should I practice Crow Pose?
Try three to five mindful attempts several times each week. Rest between attempts and stop before fatigue changes your form. Short, consistent practice usually supports progress better than occasional, exhausting sessions.
What is the difference between Crow and Crane Pose?
Crow Pose generally uses bent elbows, while Crane Pose involves straighter arms and a higher, more demanding lift. Many practitioners learn Crow first because bent elbows offer more support while developing strength, balance, and body awareness.
Practice Crow Pose with Patience, Strength, and Awareness
Crow Pose grows through gradual exposure, intelligent alignment, strength, and calm attention. Keep your hands active, shoulders moving forward, core engaged, and knees supported by your arms. Maintain a forward gaze, steady breathing, and a controlled exit.
For your next practice, choose one progression that feels appropriate today. Repeat it consistently instead of forcing a full lift. Balance is an ongoing relationship between effort and awareness, so crow pose yoga remains valuable even before both feet leave the floor.