A yoga bolster is a firm, supportive cushion that helps your body settle into poses with greater comfort and ease. Unlike an ordinary pillow, it is usually longer, denser, and designed to support your weight without collapsing. This steady foundation can make stretching feel more spacious and restorative.
You might use a bolster beneath your spine, knees, hips, or head. It can soften the effort of a pose, encourage deeper breathing, and help your nervous system shift toward relaxation. In this way, props are not signs that you are less flexible or experienced. They are practical tools for awareness, balance, and meeting your body where it is today.
Whether you are beginning yoga or creating a more sustainable home practice, a bolster can support many paths toward mindful movement. It may help you stay comfortably in a pose longer, notice areas of tension, and explore stillness without forcing your body. Joyous Yoga celebrates this kind of personal, compassionate practice.
In this guide, you will learn how yoga bolsters are made, what benefits they offer, and how to choose and use one safely. You will also discover beginner-friendly poses, helpful setup tips, and ways to adapt your practice for relaxation, recovery, and everyday balance. With the right support, yoga can feel more welcoming—and more connected to your unique journey.
Understanding the Yoga Bolster: Shape, Materials, and Types
A yoga bolster is a supportive cushion designed to help your body relax, align, and stay comfortable during practice. It typically has dense foam, cotton, or a blend of natural fibers inside. This firm filling distributes your weight without collapsing quickly, making it useful for restorative yoga, gentle stretching, breathwork, and meditation.
Most bolsters include a durable, washable cover. Many also have a carry handle, so you can move them easily between rooms or take them to class. The outer surface should feel firm yet welcoming, offering steady support beneath your back, legs, hips, or chest.
The bolster’s shape affects how it supports you. Round bolsters have a cylindrical form that can encourage gentle opening across the chest, hips, and spine. Their curved surface also provides rolling support, which can feel soothing in side-lying poses or supported backbends.
Rectangular bolsters offer a wider, flatter base. They are often more stable for beginners and may feel secure beneath the spine, knees, or upper body. Their straight edges can also make stacking or positioning other props easier.
Specialty designs include contoured bolsters, pranayama bolsters, and smaller cushions for specific areas. Some have angled or tapered sides to support the neck and head. Others are shorter and lighter, making them convenient for travel or targeted support during seated practices.
When choosing a yoga bolster, consider these features:
- Firmness: A firmer bolster offers stable lift, while a softer one may feel more comfortable for relaxation.
- Height and length: Taller or longer bodies may need more support. Smaller practitioners may prefer a compact design.
- Weight: Heavier bolsters stay in place. Lighter options are easier to carry and adjust.
- Shape: Round bolsters encourage curved support, while rectangular ones provide a broader foundation.
A yoga bolster is different from a meditation cushion, which usually lifts the hips during seated practice. It also differs from a blanket, block, or standard bed pillow. Blankets provide flexible padding, blocks offer firm height, and bed pillows often compress too easily. Still, folded blankets, firm couch cushions, or several pillows can serve as temporary substitutes while you explore what feels supportive.
Yoga Bolster Benefits for Beginners and Mindful Practice
A yoga bolster offers steady support while your body learns to settle into a pose. Instead of forcing flexibility or trying to create a certain shape, you can use the bolster to meet your body where it is today.
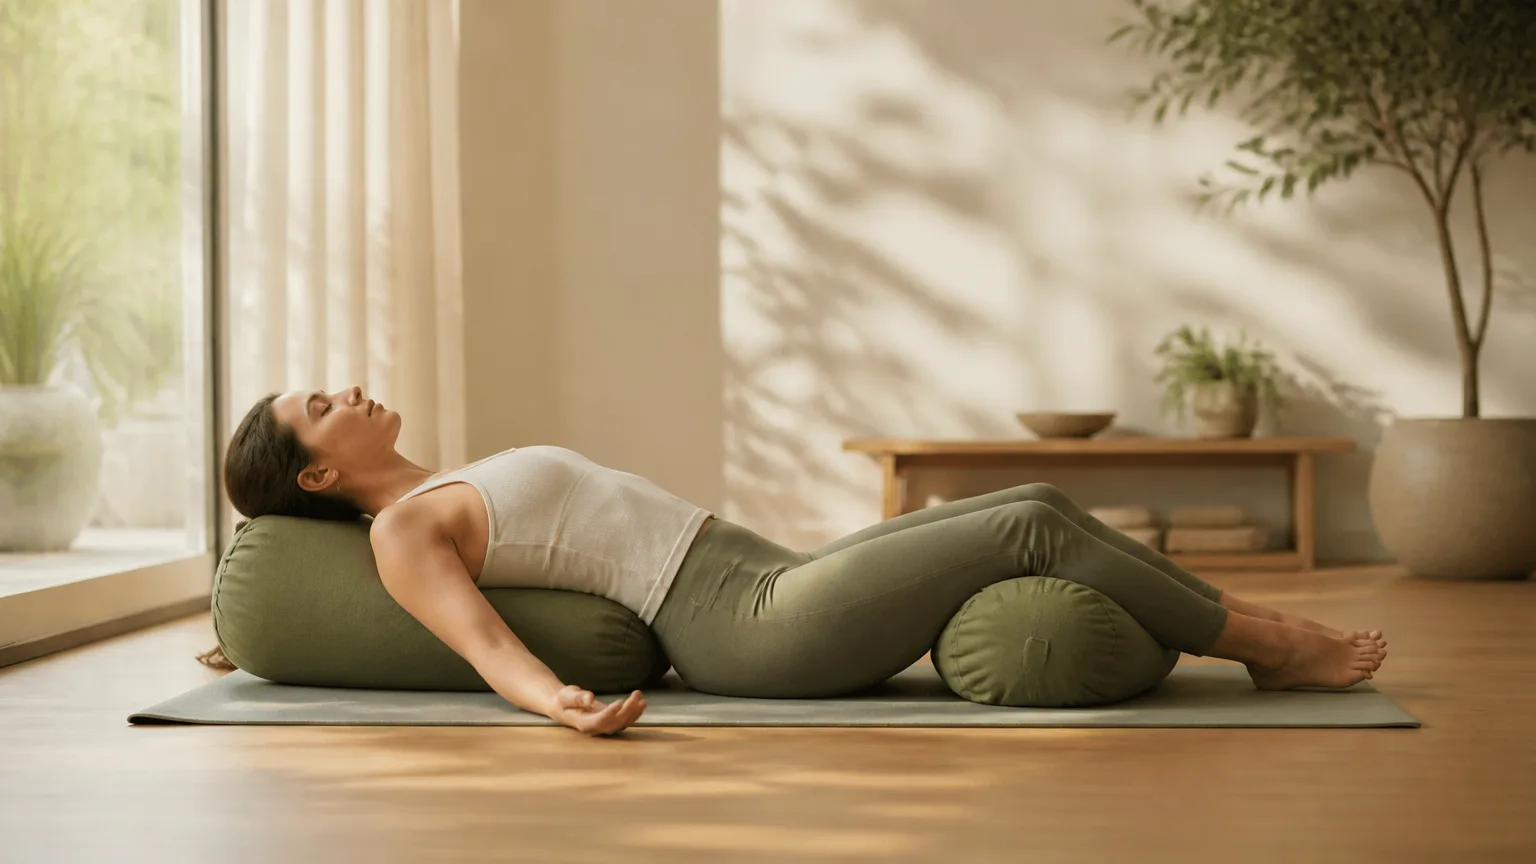
In longer-held poses, a bolster can reduce strain by supporting areas that need extra care. It may cushion the spine during a gentle reclined pose, lift the hips in seated positions, or support the knees when they do not comfortably reach the floor. You can also place it beneath the chest, abdomen, or head to create a more restful and supported experience.
This support can make it easier to slow your breathing. When the body feels held, you may notice less effort in the muscles and more space for a calm, steady breath. A quiet, supported posture can encourage the nervous system to shift toward rest, helping you practice relaxation without treating the pose as a performance.
A bolster also turns your attention inward. Rather than focusing only on achieving the “right” shape, you can observe your alignment, areas of tension, and changing breath patterns. For example, in a supported forward fold, you might notice whether your shoulders soften or whether your breath feels restricted. These observations build body awareness and strengthen a more attentive mindfulness practice.
For beginners, props can make yoga feel more accessible. A yoga bolster may be helpful if you have limited flexibility, stiffness, fatigue, or difficulty getting close to the floor. It can raise the floor toward you, reduce the need to balance, and provide comfort during restorative poses.
A bolster can also support comfort during pregnancy, when familiar positions may feel different as the body changes. Every person’s needs are unique, so seek individualized guidance from a qualified yoga teacher or healthcare professional when appropriate. Stop or adjust any pose that causes pain, pressure, dizziness, or discomfort.
The practical benefits extend beyond physical comfort. Knowing that you can rest your weight on a prop may replace pressure with curiosity. You can explore questions such as, “What feels supported?” or “Can I soften here?” This patient approach gives you permission to pause, modify, or rest without viewing those choices as failures.
Over time, supported practice can help you recognize the difference between useful effort and unnecessary strain. You may discover that progress is not always a deeper stretch. Sometimes, it is a fuller breath, a quieter mind, or greater trust in your body’s signals.
How to Choose the Right Yoga Bolster
Choosing a yoga bolster becomes easier when you focus on how you plan to use it. Consider your main practice first: restorative yoga, seated meditation, prenatal comfort, stretching, or quiet relaxation. The best bolster is not always the most attractive one. It is the one that supports your body and fits naturally into your routine.
Start With Firmness
Firmness should be your first consideration. A bolster should support your weight without flattening excessively, especially beneath your spine, knees, or hips. At the same time, it should not feel so hard that it creates pressure points.
If possible, test the bolster before buying. Lie across it and notice whether your body feels lifted, supported, and able to relax. For seated poses, check that it provides steady height without making your pelvis feel uncomfortable.
Choose a Shape
Round bolsters provide gentle height and can feel comfortable beneath the knees, spine, or ankles. Their curved shape works well for supported backbends and flowing transitions. However, they may roll slightly and require more balance during some poses.
Rectangular bolsters offer a wider, flatter, and more stable surface. They are often more versatile for restorative poses, including supported Child’s Pose, reclining poses, and chest-opening setups. Their shape also makes them easier to stack, store, and use as a firm platform.
Check the Dimensions and Materials
Think about your body size, available floor space, and storage needs. A longer bolster may better support your full spine, while a compact model can work well in a small apartment. Confirm that it fits comfortably on your yoga mat without crowding your practice area.
Cover fabric also matters. Look for a durable, comfortable material that does not feel scratchy against bare skin. A removable, washable cover makes regular use easier, especially if you practice often or share your props with family members.
Small details can improve everyday convenience. Handles make a bolster easier to carry between rooms or to class. Common fillings include cotton, polyester fiber, and foam. Cotton often feels firm and substantial, while fiber-filled options may feel softer and lighter.
Consider Stability and Value
A quality bolster should hold its shape over time and resist sagging at the center. Check reviews for comments about stitching, filling, and durability. It should also stay stable on your yoga mat rather than sliding during transitions or supported poses.
Your budget matters, but a durable bolster can be a worthwhile long-term investment. Before adding other home props, review the Gaiam yoga mat buying guide. Comfort, grip, materials, and your practice environment all shape a supportive home setup.
Setting Up a Safe and Comfortable Bolster Practice
Before you begin, create a calm practice area with enough space to move on and off your yoga bolster without rushing. Choose a stable, nonslip surface, such as a yoga mat on the floor. Keep nearby blankets, blocks, or folded towels so you can adjust your support easily.
Place the bolster according to the pose you plan to practice. Before settling in, check that it supports the intended area rather than pressing directly into your neck, lower back, joints, or abdomen. For example, in a supported backbend, the bolster may run along your spine, while your head rests comfortably on the mat or a folded blanket.
Test the setup before committing your full weight. Sit, recline, or lean onto the bolster gradually, noticing how your body responds. If the bolster feels too high or firm, add a blanket for softer support or place a folded towel beneath your head, knees, or wrists.
Move slowly during every transition. Use your hands to guide your body, and avoid dropping onto the bolster or pushing quickly into a deeper shape. Once you arrive, let your breath remain relaxed and steady. If you cannot breathe comfortably, the setup likely needs adjusting.
Give yourself time to notice alignment. Your shoulders should feel supported rather than compressed, and your joints should not be forced into unusual angles. In restorative poses, comfort does not mean complete stillness; small changes can help your muscles release and your breath move more freely.
Use these simple checks before staying in a pose:
- Notice whether the support feels even and stable.
- Take several unhurried breaths.
- Check for pressure around your neck, spine, abdomen, and joints.
- Adjust or come out if anything feels strained, restricted, or uncertain.
Discomfort, numbness, sharp pain, dizziness, breath restriction, or joint pressure are clear signals to leave the pose. Exit gradually, pause on your side or in a neutral position, and reassess before trying again. A smaller range of motion is often the more supportive choice.
If you are exploring props beyond a bolster, review this guide to a yoga ball for home practice and stability. A ball requires different balance considerations, so choose equipment that matches your experience and practice space.
People with injuries, significant pain, recent surgery, pregnancy, or medical conditions should seek guidance from a qualified yoga teacher or healthcare professional. Personal support can help you adapt poses safely and build confidence while honoring your body’s unique needs.
Beginner-Friendly Yoga Bolster Poses
A yoga bolster can make familiar poses feel more supported, steady, and spacious. The goal is not maximum flexibility. Yoga can adapt to different bodies and energy levels, whether you are practicing actively or seeking deep rest.
Supported Child’s Pose
Kneel with your knees comfortably apart and place the bolster lengthwise between them. Fold forward, resting your torso on the bolster, and turn your head to one side. Switch your head position halfway through, or use a folded blanket if your neck feels strained.
Stay for 1–3 minutes, breathing slowly into your back and ribs. A common mistake is forcing the hips toward the heels or letting the head hang awkwardly. For an easier option, widen the knees, sit on a blanket, or place another cushion beneath your chest.
Supported Reclined Bound Angle Pose
Sit with the bolster behind you, then lower back slowly so your spine rests along it. Bring the soles of your feet together and allow your knees to open naturally. Add blankets beneath the knees or behind your head as needed.
Remain for 2–5 minutes, keeping your breath relaxed and unforced. Do not press the knees down or chase a stronger hip opening. If this shape feels intense, keep the legs bent with feet on the floor, or support the knees with several cushions.
Supported Bridge Pose
Lie on your back with your knees bent and feet grounded. Lift your hips slightly and place the bolster beneath your sacrum, the broad bony area at the back of your pelvis. The bolster belongs beneath the pelvis, not the lower back.
Hold for 30 seconds to 2 minutes, breathing smoothly through the chest and belly. Avoid pushing into a high bridge or allowing the knees to drift apart. For a gentler version, use a folded blanket or keep the pelvis on the floor.
Restorative Twist
Lie on your side with the bolster in front of you. Bend your knees comfortably and rotate your torso toward the bolster, resting your chest and arms on it. Hold for 1–3 minutes per side, breathing into the back ribs.
Avoid pulling the shoulders or forcing the twist. Make the pose easier by adding blankets under your head, knees, or top arm.
Supported Seated Forward Fold
Sit with your legs comfortably extended or softly bent. Place the bolster across your thighs and fold forward, resting your torso on it for 1–3 minutes. Breathe steadily and let your spine lengthen without rounding aggressively.
A common mistake is reaching for the toes. Bend your knees more or sit on a blanket to reduce tension.
Legs-Up-the-Wall
Place your bolster under the pelvis only if it feels stable and comfortable; otherwise, practice without it. Rest your legs against a wall for 3–8 minutes, breathing quietly. Do not let the bolster slide or create pressure in the lower back.
If this setup feels unsuitable, rest your calves on a chair instead. This gentle approach, similar to printable chair yoga for seniors, reminds us that support can meet us wherever we are.
A Simple 15-Minute Yoga Bolster Sequence for Beginners
Create a quiet space with your yoga bolster, mat, and one or two blankets. Begin seated for one to two minutes, using the bolster beneath your hips if it helps you sit comfortably and lengthen your spine. Let your hands rest on your thighs, soften your gaze, and notice each steady breath.
Move into supported child’s pose for about two minutes. Kneel with your knees comfortably apart and place the bolster lengthwise beneath your chest. Fold forward, turning your head to one side, and allow your arms to rest wherever they feel relaxed. Switch the direction of your head halfway through.
Slowly return to sitting, then set up a gentle supported chest opener. Lie back with the bolster lengthwise beneath your spine, supporting your head with a folded blanket if needed. Keep your knees bent and feet grounded, or extend your legs if that feels comfortable. Stay for two minutes without forcing your shoulders open.
Next, practice reclined bound angle for three minutes. Bring the soles of your feet together and let your knees release outward. Place blankets beneath your thighs for support, then rest your back over the bolster. If your hips or knees feel strained, keep your legs bent and closer together.
Transition carefully into a supported twist. Lie on your back and draw your knees toward your chest. Lower both knees to one side, placing the bolster beneath them so your legs can relax. Keep both shoulders comfortable, and turn your head only if your neck feels free. Stay for two minutes, then switch sides.
Finish in a neutral resting position, such as lying on your back with your legs extended or knees supported by the bolster. Remain still for several minutes, breathing naturally and noticing how your body feels.
You can shorten the holds, add blankets, practice near a wall, or choose only one restorative pose. Skip anything uncomfortable. Consistency and attentive breathing matter more than intensity, flexibility, or completing every step.
Frequently Asked Questions About Yoga Bolsters
Can I use a regular pillow instead of a yoga bolster?
Yes, a regular pillow can work as a temporary substitute. Folded blankets, firm couch cushions, or several pillows may provide useful support while you learn what feels comfortable.
However, standard pillows often compress or shift more easily. They may not offer the same stable height or firm, even support as a yoga bolster. Check your setup before settling in, and add a non-slip layer if needed.
Is a yoga bolster only for restorative yoga?
No. Bolsters are especially helpful in restorative yoga, where the body remains supported for longer periods. They can also support meditation, gentle stretching, prenatal modifications, and cooldowns.
Use the bolster to reduce strain, not to force your body into a shape. If you feel pinching, numbness, or pressure, adjust the prop or choose another position.
Should a yoga bolster be hard or soft?
A supportive firmness is usually more useful than a plush cushion that collapses beneath you. A firm bolster can maintain its shape and provide steady support under the spine, knees, hips, or head.
The best choice still depends on your body and the pose. You should feel held, comfortable, and able to breathe naturally.
How long should I stay in a supported pose?
Beginners might start with three to five minutes, then gradually extend the hold if it feels good. Some restorative poses may eventually last 10 minutes or longer.
There is no required timer. Let steady breathing, comfort, and your individual needs guide you. Come out sooner if you feel strain, tingling, dizziness, or restlessness.
Can beginners use a yoga bolster safely?
Yes. Beginners can use a yoga bolster safely by setting up gradually and choosing simple, well-supported poses. Place it on a stable surface, keep nearby supports within reach, and make small adjustments before relaxing fully.
Qualified instruction is wise if you are pregnant, recovering from an injury or surgery, managing significant pain, or living with a medical condition. A knowledgeable teacher can help you adapt poses while honoring your body’s signals.
Making the Yoga Bolster Part of a Sustainable Practice
A yoga bolster is more than a cushion for difficult poses. It offers steady, adaptable support that can help your body settle without forcing it into greater range. The bolster does not make practice easier in a superficial sense. Instead, it can create space for steadier breathing, clearer awareness, and less unnecessary strain.
Begin with one or two supported poses, such as Reclined Bound Angle or Supported Child’s Pose. Stay for a few quiet minutes and notice how your body responds. Does your breath soften? Do you feel more grounded, or do you need to adjust the height and position?
From there, build a short routine you can repeat comfortably. A few minutes of supported movement, relaxed breathing, and stillness may offer more lasting value than an intense session you cannot sustain. Let comfort guide you, while continuing to respect any pain or warning signals.
This approach reflects yoga’s deeper values of presence, compassion, and non-force. Practice is not only about physical achievement. It is also about listening, responding wisely, and carrying greater steadiness into daily life. To explore how yoga can become a way of serving and connecting with others, read about karma yoga. For now, begin simply: choose a supportive pose, breathe naturally, and meet yourself where you are.